Monday, October 22, 2012

Fresh Face.

   Everyone wants pretty skin! A good start would be to eat right and get a good amount of exercise. Also relaxing could really help! While you relax why not love your skin with a very simple face mask. WAIT RIGHT THERE! Don't jump up to go to the store just yet. Why not make your own mask? here are a few simple masks to try. When I say simple I mean simple because most only use a few things that you usually find right in your home!


All Types of Skin.


 1. Oatmeal Mask
You will need:
  • 1 tbsp oatmeal, finely ground
  • 1 tbsp live, organic yogurt (skip the flavored stuff)
  • A few drops of honey
First mix the yogurt and oatmeal. Then add you honey after you have warmed it a bit. After a good ten minuets rinse your skin!
 So easy right??

 2. Kitty Litter Mask
This one may seem weird but "Natural clay cat litter is made of clay formed into tiny pellets and dried. When shopping for a natural clay cat litter, check the ingredients for "sodium betonite clay" or "100 percent natural clay." These are the same clays found in more expensive masks.


You will need :
  • 1 bag cat litter (must be marked properly, see above)
  • Water
  • Drops of your favorite essential oil

Mix all ingredients and apply. Wash skin after 15 mins and wa la! smooth skin!

Dry Skin


1. Avocado mask
 You will need:
  • ½ avocado
  • ¼ cup honey
Mix and apply to dry skin for 10 mins. Follow up with cold water and moisturizer. 

2. The Milk Mask -
This is one to try with a friend!!
  You will need:
  • 1 tsp powdered milk
  • 1 tbsp runny honey
  • 1 tsp aloe vera gel
  • 2 drops essential oil
 Mix all and apply for 15 mins. Wash with warm water and apply your moisturizer!

Oily Skin


1. Aspirin

You will need:

  • 1-3 aspirin
  • Coffee cup or glass cup
  • Warm honey (runny honey)
  •  moisturizer made for the face or natural oil such as almond, olive or coconut
 Smooth aspirin with cup. Then mix in remaining things. Set on face for 10 mins.

2.  Banana

You will need:
  • 1 banana, preferably ripe (you can keep ripe bananas in the freezer. Let it thaw before using)
  • 2 tbsp honey
  • An orange or a lemon
Mix all things into a paste (you only need a few lemon/ orange juice drops).  Wash after 15 mins.


Hopefully after a little love your skin will thank you with a fresh glow. For these and more skin masks try http://beauty.about.com/od/skinflaws/a/facemasks.htm


Ani <3

Wednesday, October 10, 2012

Coats for the Closet

   Since it is getting cold there is something everyone needs, a good coat collection! Everyone has different body shapes so you have to make sure to choose the right one for your body type but these styles are must haves!!

Trench
  Every girl needs a trench coat. These come back year after year, never going out of style. They can make any outfit more classy. They are also great for any rainy weather!
    
Get some ideas from this huge coat photo!
http://thetrendyfashionista.blogspot.com/2010/06/saturday-outfit-trench-love.html


(if you are a curve-less girl look for coats with a belt to give you curve. If If you are a busty girl go for a coat with double breasted buttons to hold the ladies down. Short ladies need to look for a trench that is too long so it doesn't swallow you or even a coat that buttons at top but opens on bottom.)

Leather
   Mixed with the right outfits these can do wonders. Black leather with edgy clothing it can really being the topping on the cake. Black mixed with a more girly outfit it can give a little contrast adding a more rock star vibe to your look.  Don't forget your browns, they will make outfits look a little more polished.

http://www.aliexpress.com/item/2012-free-shipping-jacket-women-jacket-black-red-jacket-size-S-M-L-fashion-jackets-dropship/539153612.html


http://www.aliexpress.com/item/Free-shipping-2012-Autumn-Women-Fashion-Quality-Motorcycle-Zipper-PU-Leather-Short-Jacket-Coat/620080214.html

(PS really leather is nice but faux leather can do the same job and are not as hard to take care of. They are also a lot cheaper! Go for the faux. This might just be me but any leather that goes past the hip is just too long and you will look like you fell out of the matrix.)


Cropped
   Some days your outfit is just too cute to hide. That doesn't mean you should go out without something warm on top! Cropped coats tend to not be the main focus of the outfit because they a little shorter.
http://girldir.com/fashion-trends/what-wear-fall


(Short ladies cropped jackets were made for you while taller should try and find on that hits at the waste. Curvy girls also try no to go with anything too fitted or too loose. You will need to find something that lightly hugs the body and a good ruffle along the bottom looks awesome.)
                           The curvy girl crop
http://www.stylishcurves.net/2010_09_12_archive.html

Loud
  Everyone needs one coat that is the center off attention, however. I would go for a nice loud color like red.
http://www.bachmanssparrow.com/blog/outfits/red-is-the-color-of-the-sun-with-my-eyes-closed/
http://thetightsthatbind.blogspot.com/2010/11/things-that-rhyme-with-purple.html


(Just be careful that the color you choose isn't too loud for you. YOU still wanna be the center of attention. A deep purple or green could work. )

Pattern
  This style isn't for me personally but I have been seeing a large trend in pattern coats. A favorite seems to be a good animals print. 
http://dashinga.com/cheetah-in-the-rain/

(Since a patterned jacket is going to be very loud you have got to beware of wearing clothing that is also loud. Go for more neutral, simple clothing. )


ANI <3

Thursday, October 4, 2012

What to do/eat/wear for fall.

   Ready or not fall is coming! I have already stated to see leaves turning yellow and falling! I haven't decided if I am excited or not. I am because there are so many fun things to do and eat during the fall season. The weather is nice too. However, as it gets colder I will probably stop wearing dresses as often and I am not too exited about that. Oh well I suppose there are always leggings. Anyway. I wanna make the most I can for fall. Here is a list of things I will be trying to get done during fall that you should try. 

Carve Pumpkins
http://www.thegreenhead.com/2009/09/professional-pumpkin-carving-tools.php


Caramel some apples
http://frantasticfood.com/?p=7738


Jump in some crunchy leaves
http://ceeslifephotographyblog.wordpress.com/2012/01/04/a-special-walk/


Make some warm food and watch a movie


Wear some cute boots
http://everydaythreads.wordpress.com/2010/10/27/fashion-trend-adorable-fall-boots-under-50/ 

Fall walks
http://evgrieve.com/2011/11/little-fall-of-rain.html
 
 Hopefullly I am able to get alot more done! ANI

Friday, September 28, 2012

Nice Nails

   A good friend of mine told me once that the key to looking your best was to have perfectly groomed eyebrows but I think to look perfectly polished you must have clean nails! I really do think this is true. Ill see women with their nails chipped and just think "wow she must not be very clean" before I even can stop myself. On the other hand I see people with perfectly polished hands and cant help but think how put together they are. This doesn't just include polished fingers but even bare nails that are clean and even. Iv found some nail tips to keep your hands looking perfect!

1st.
 Chipped or uneven nails are never pretty.
These nails need love

I don't care how long you want them to be. If your nails have jagged edges or you have several different lengths on all your fingers it looks like you wont spend a little time loving yourself. I'm guilty on this one! However, spend a few minuets one time a week making sure you pamper your hands and nails I mean they do so much for you every day!

2nd.
Long nails aren't for everyone.
Cute, clean, short nails

Sadly this includes myself. why you ask? If you have thin, or dry nails they just break easily and its a lot of work to grow them out. You can always try treatments but sometimes it is best to work with nature instead of against it. Also, did you know it has been a trend to have short nails?! They look more clean and less stripper-ish than a 2 inch nail!

3rd.
Are you one of those ladies that cant grow their nails out but  just has to have long nails?

There isn't a problem with that either! There are a lot of styles that you can accomplish with acrylic nails. Round and squared edges are the most popular but lately I have been seeing a lot more nails coming to a point.

Rounded

Squared
Stars are sporting pointed nails

When getting acrylics keep in mind a few things. Are you gonna do them your self or go to a nail salon? If you do them yourself make sure to practice and have to routine down. I have several friends who have cosmetology licenses and still prefer to go somewhere to get them done. When you go to a salon you need to choose someone who has some kind of license to do them. They have been trained to properly do your nails as well as keep their tools clean.
A clean and organized salon
 Next, you need to think about the commitment you are going to make. Acrylic nails cost money and it is a routine you will be repeating often for fills and replacements. If you do decide to take them off your nails underneath with not be perfect and will need extra love until they grow out. Acrylics can be very damaging to your real nails. Last, Think about how long you want them. This is actually a big deal. How do you want your nails to make you come across? Sometimes your acrylic nails can actually be too long for you. When you cant pick up small objects and seem to be stabbing people its time to trim them down. What ever the case nails should never be longer than the width of you thumb pad. You don't wanna look scary to children!

How long does the polish take to dry on those?


3rd.
Gel nails and gel polish is a new fad that I am loving. A lot of the same rules apply as the do for acrylics when looking for a salon but gels are not as damaging to your nails. For gel nail services beware! If the salon uses a powder to apply a gel nail it isn't a true gel. Another problem is that some products are rumored to melt and make strange wrinkles in gel.
Gel nail

 I personally like gel polish. I works the same as nail polish but it makes your nails stronger and it lasts for 3 weeks. I had some that lasted so long I had to take it off finally due to my nails growth! The gel polish does leave the nail underneath dry sadly and can't add any length to the nails at the time of service. It is kinda hard to find if you wanna do it yourself but I think its worth it. Gel polish also doesn't work like traditional polish either. It should done useing a curing method so once your done curing no dry time is needed. Good bye messed up polish!
Gel polish
4th
To make any manicure look its best you need a clean canvas. Make sure you spend time taking care of those hands! Cuticles need to be pushed back and hangnails need to be cut.

 Also soften your hands with a good lotion to keep hands soft ad smooth
Clean hands


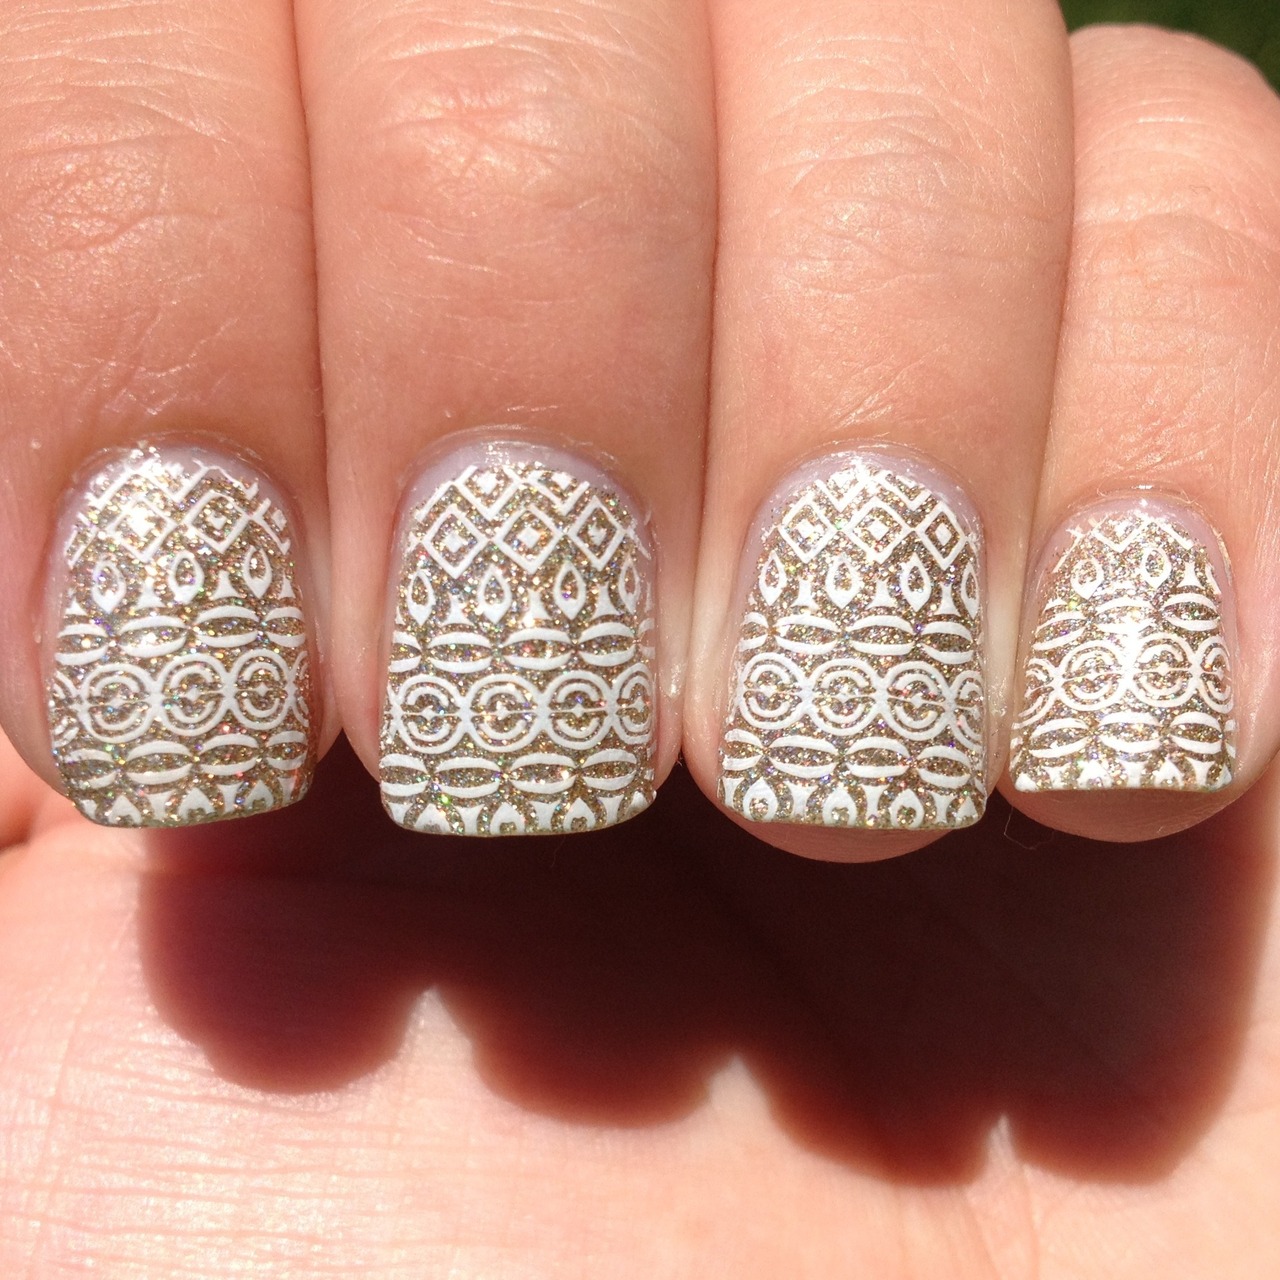
Here are some nail design ideas that I love!


Golden lace

Cherry Blossom
News Print

Splat!

ANI<3

Friday, September 7, 2012

Photo Contest

   Photo contests are everywhere. They look for breath taking photos of so many different things. Many contest judges have different interests in the style of photography they like and they usually set a theme about photo content. National Geographic likes to have a contest  for photos with people, places, and nature. Here are some of the best photos from the last photo contest.

PLACES
Anuar Patjane
Bhaktapur rains.

Hung-Hsiu Shih 
 Fire fishing ritual in Formosa.

PEOPLE

Lisa Clarke  
Family dresses as zombies in Queensland to raise money for  a good cause.

Alessandro Citti
Women at the last supper.

NATURE


Shikhei Goh 
 Dragonfly in the rain.

dafna ben nun 
Beluga whales.


Want to see more photos?!Look at the  Photo Contest page of National Geographic. While you are there roam around the site. They have tons and tons of amazing photos. Maybe you can even submit your own  entry into the contest. Not for you or not your style? Try a smaller contest in your own town! You can probably find a contest that is looking for photos that look just like the ones you take!
ANI

Tuesday, August 28, 2012

Sushi

    I have noticed alot of people in the last few years who are crazy about sushi. I am not as exctied about it but I try to taste the different kinds and have begun to like sushi that incorporates shrimp. I found a little guide to help you make sushi at home!

Sushi making step 1


The first thing you need is a roll matt.

If you cover it in cling film before use it will last much longer.

Place a sheet of nori on the matt with the shiny side facing down and the lines in the nori running vertical.


Sushi making step 2


Wet your hands with a little water mixed with vinegar, then pick up around 200g of cooked sushi rice.


Sushi making step 3


Evenly spread the rice over the nori sheet ensuring that you do not compact it too much.

Wet your hands with a little more water if necessary.
 

Sushi making step 4


Spread the rice right out to the edges of the nori and leave a 2 cm gap at the top of the seaweed without any rice on it.
 

Sushi making step 5


Make a horizontal groove in the rice running down the centre and then place the fillings of your choice on it. We recommend: cucumber, Japanese omelette, BBQ eel, tuna mayo ir avocado.
 

Sushi making step 6

 
Carefully begin rolling the matt from the edge nearest you by placing your thumbs under it and your fingers on the filling. Press down a little as you roll, but not so tightly that the rice and filling comes out the sides.


Sushi making step 7


When the top of the roll matt reaches the edge of the rice, pull out the end of the matt so that it is not rolled up in the sushi.

Sushi making step 8


Holding the matt away from the sushi, flip the roll over one more time so the the seaweed is totally wrapped around the rice.


Sushi making step 9

 
Gently press the sides of the roll with fingers to flatten, and carefully remove the matt from around the sushi.

Sushi making step 10


Cut the roll in half using a sharp knife that has been dipped in a mix of vinegar and water. Then place the two halves next to each other and cut into thirds.

Sushi making step 11

 
Your sushi is ready. Enjoy with some wasabi paste and soya sauce.
 
There you are sushi lovers! If you liked this how to check out The Good Food Channel at http://uktv.co.uk/goodfood/homepage/sid/566
 
Ani <3